


Permission Sets
Merchant Permissions (Client Role)
Loan Origination
Users/Employees are able to create contracts within uPortal360. (This is a default permission to a user with a Merchant role)
Manage Customers
User’s Employees can search for customers through the “Quick Search” and have access to viewing account details. (This is a default permission to a user with a Merchant role)
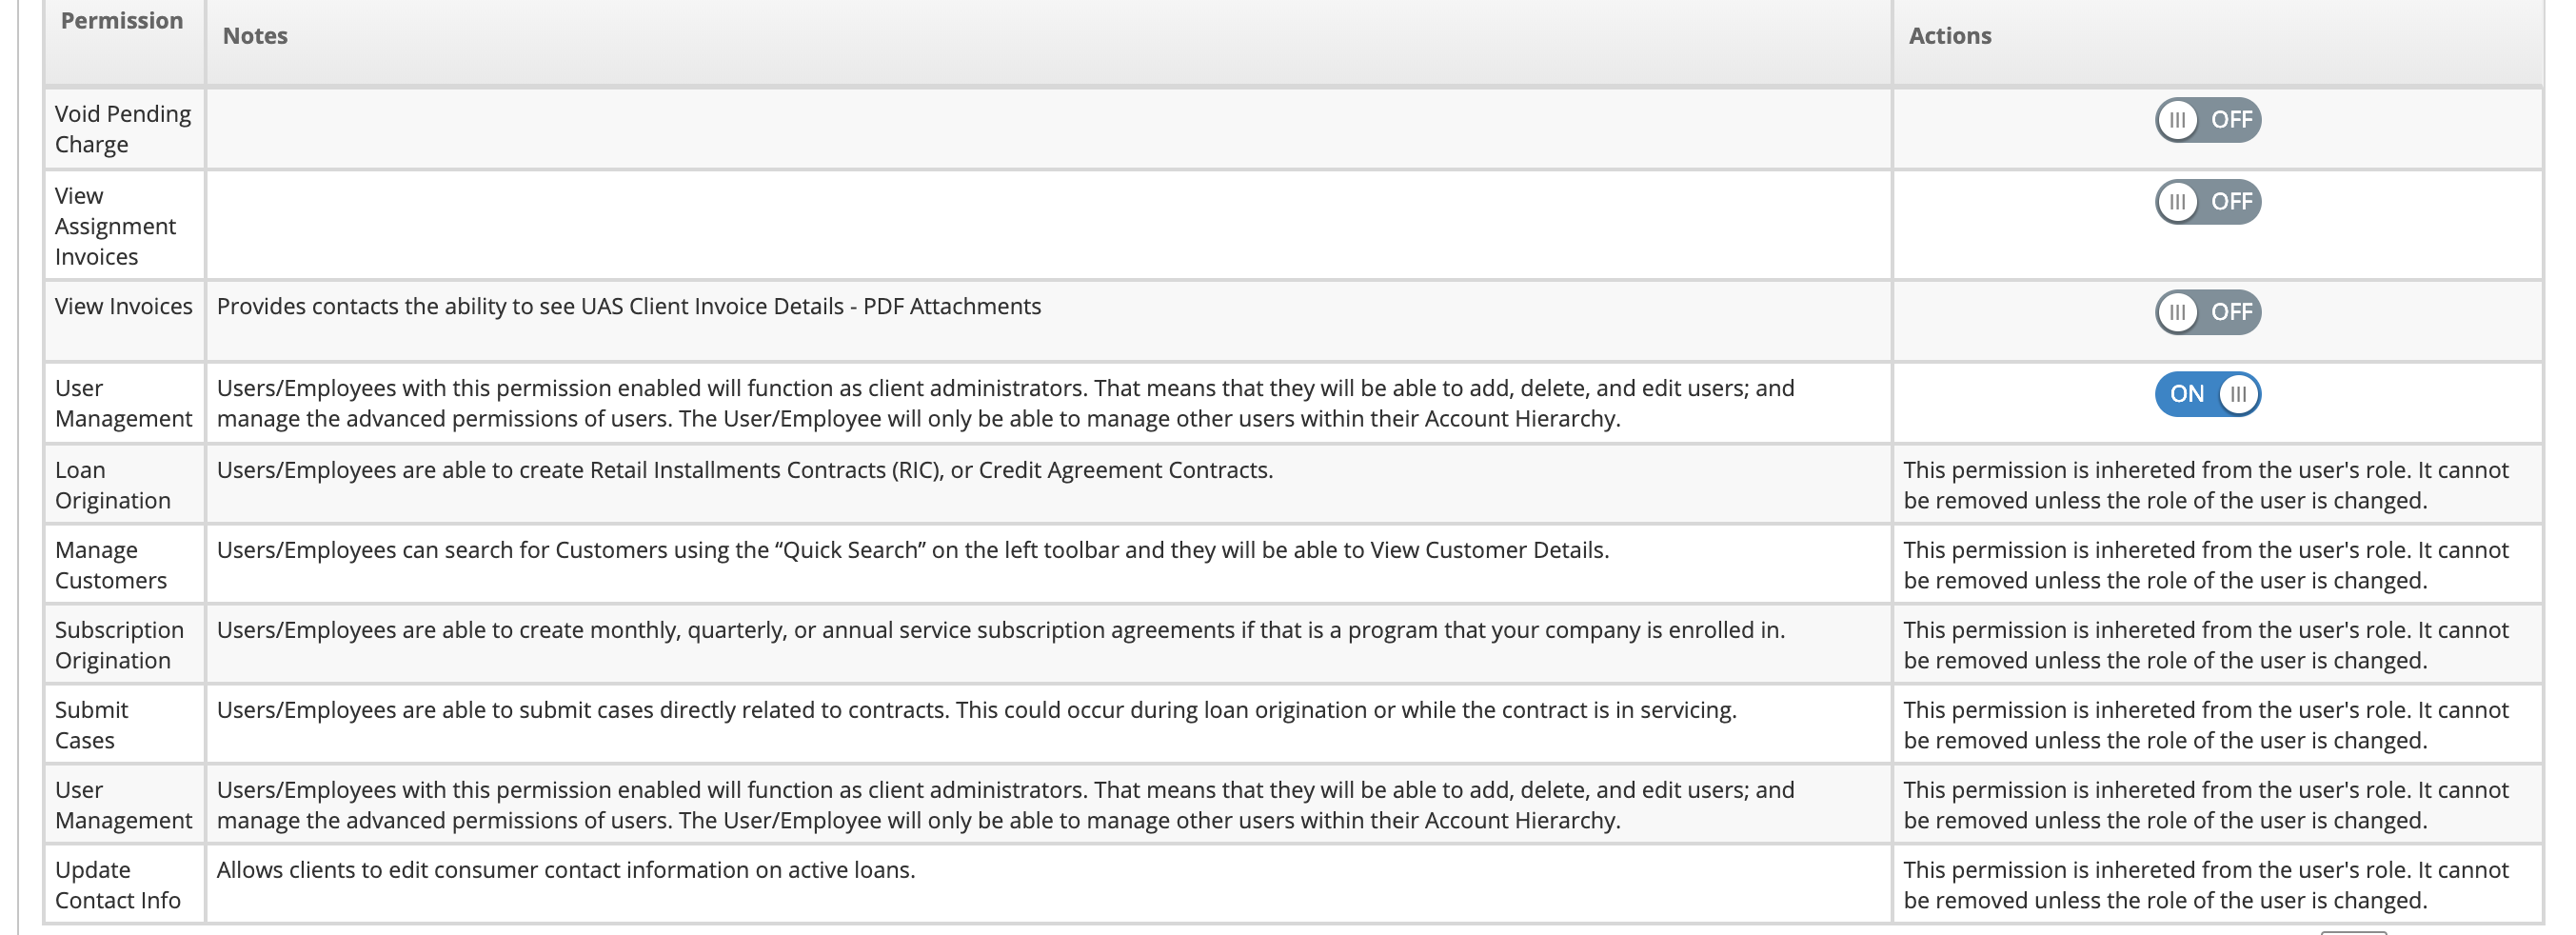
User Management
Users/employees with this permission will function as merchant administrators. This means that they will be able to add, delete and edit users within the company; and manage the advanced permissions.
Submit Cases
Overview: This permission allows clients to submit cases on consumers contract accounts. This can take place during origination or after a loan has gone active.
How to use this permission:
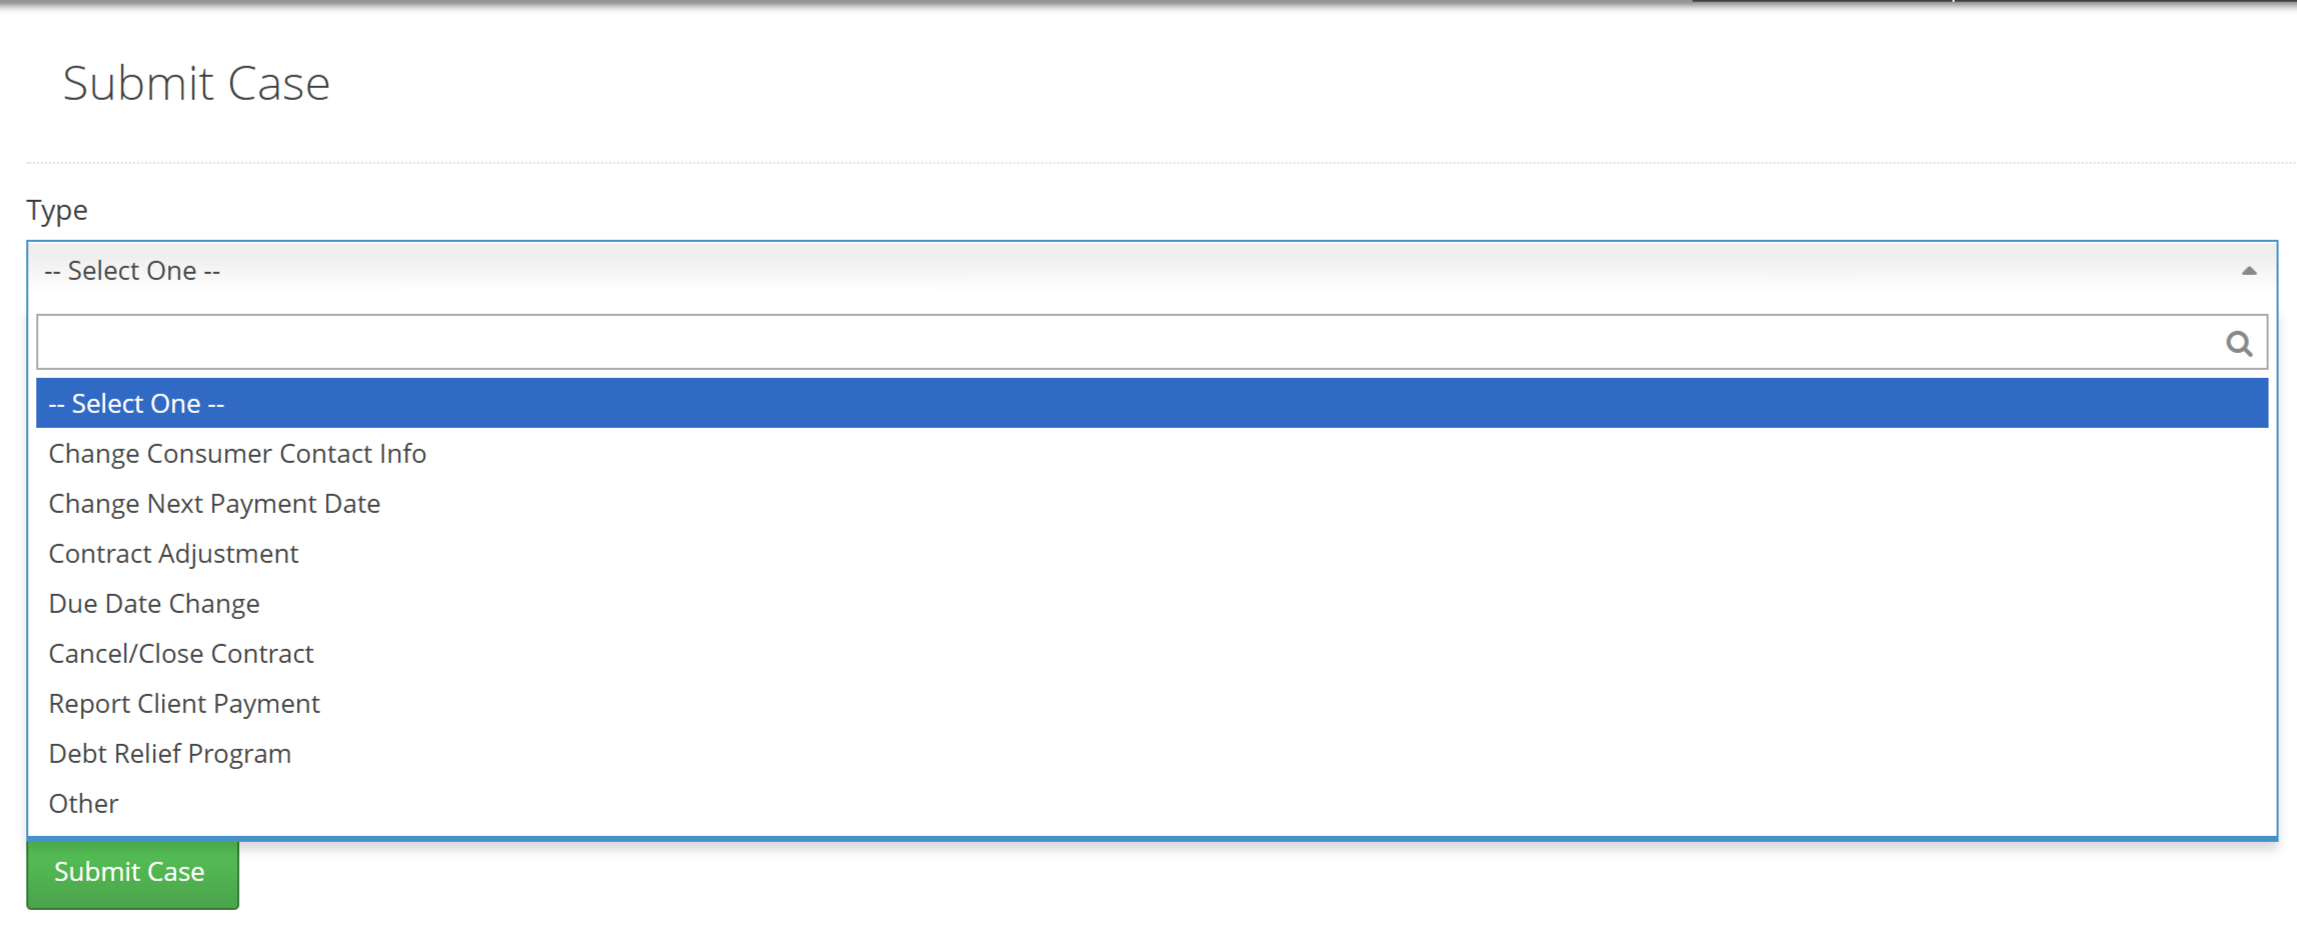
Navigate to
Client Actions —> Submit CaseSelect a case type from the provided list, a title for the case, and a brief description about the reason for submitting this case
Change Consumer Contact Info - Something about the consumers contact needs to be updated or changed (Phone #, address, etc.)
Change Next Payment Date - The upcoming payment date needs to moved or changed
Contract Adjustment - A consumers contract needs to be changed (Monthly payment, credit limit, etc.)
Due Date Change - Changing the date that the payment is due
Cancel/Close Contract - A consumers contract needs to be ended
Report Client Payment -
Debt Relief Program -
Other - Any reason that does not fit into any of the above listed options
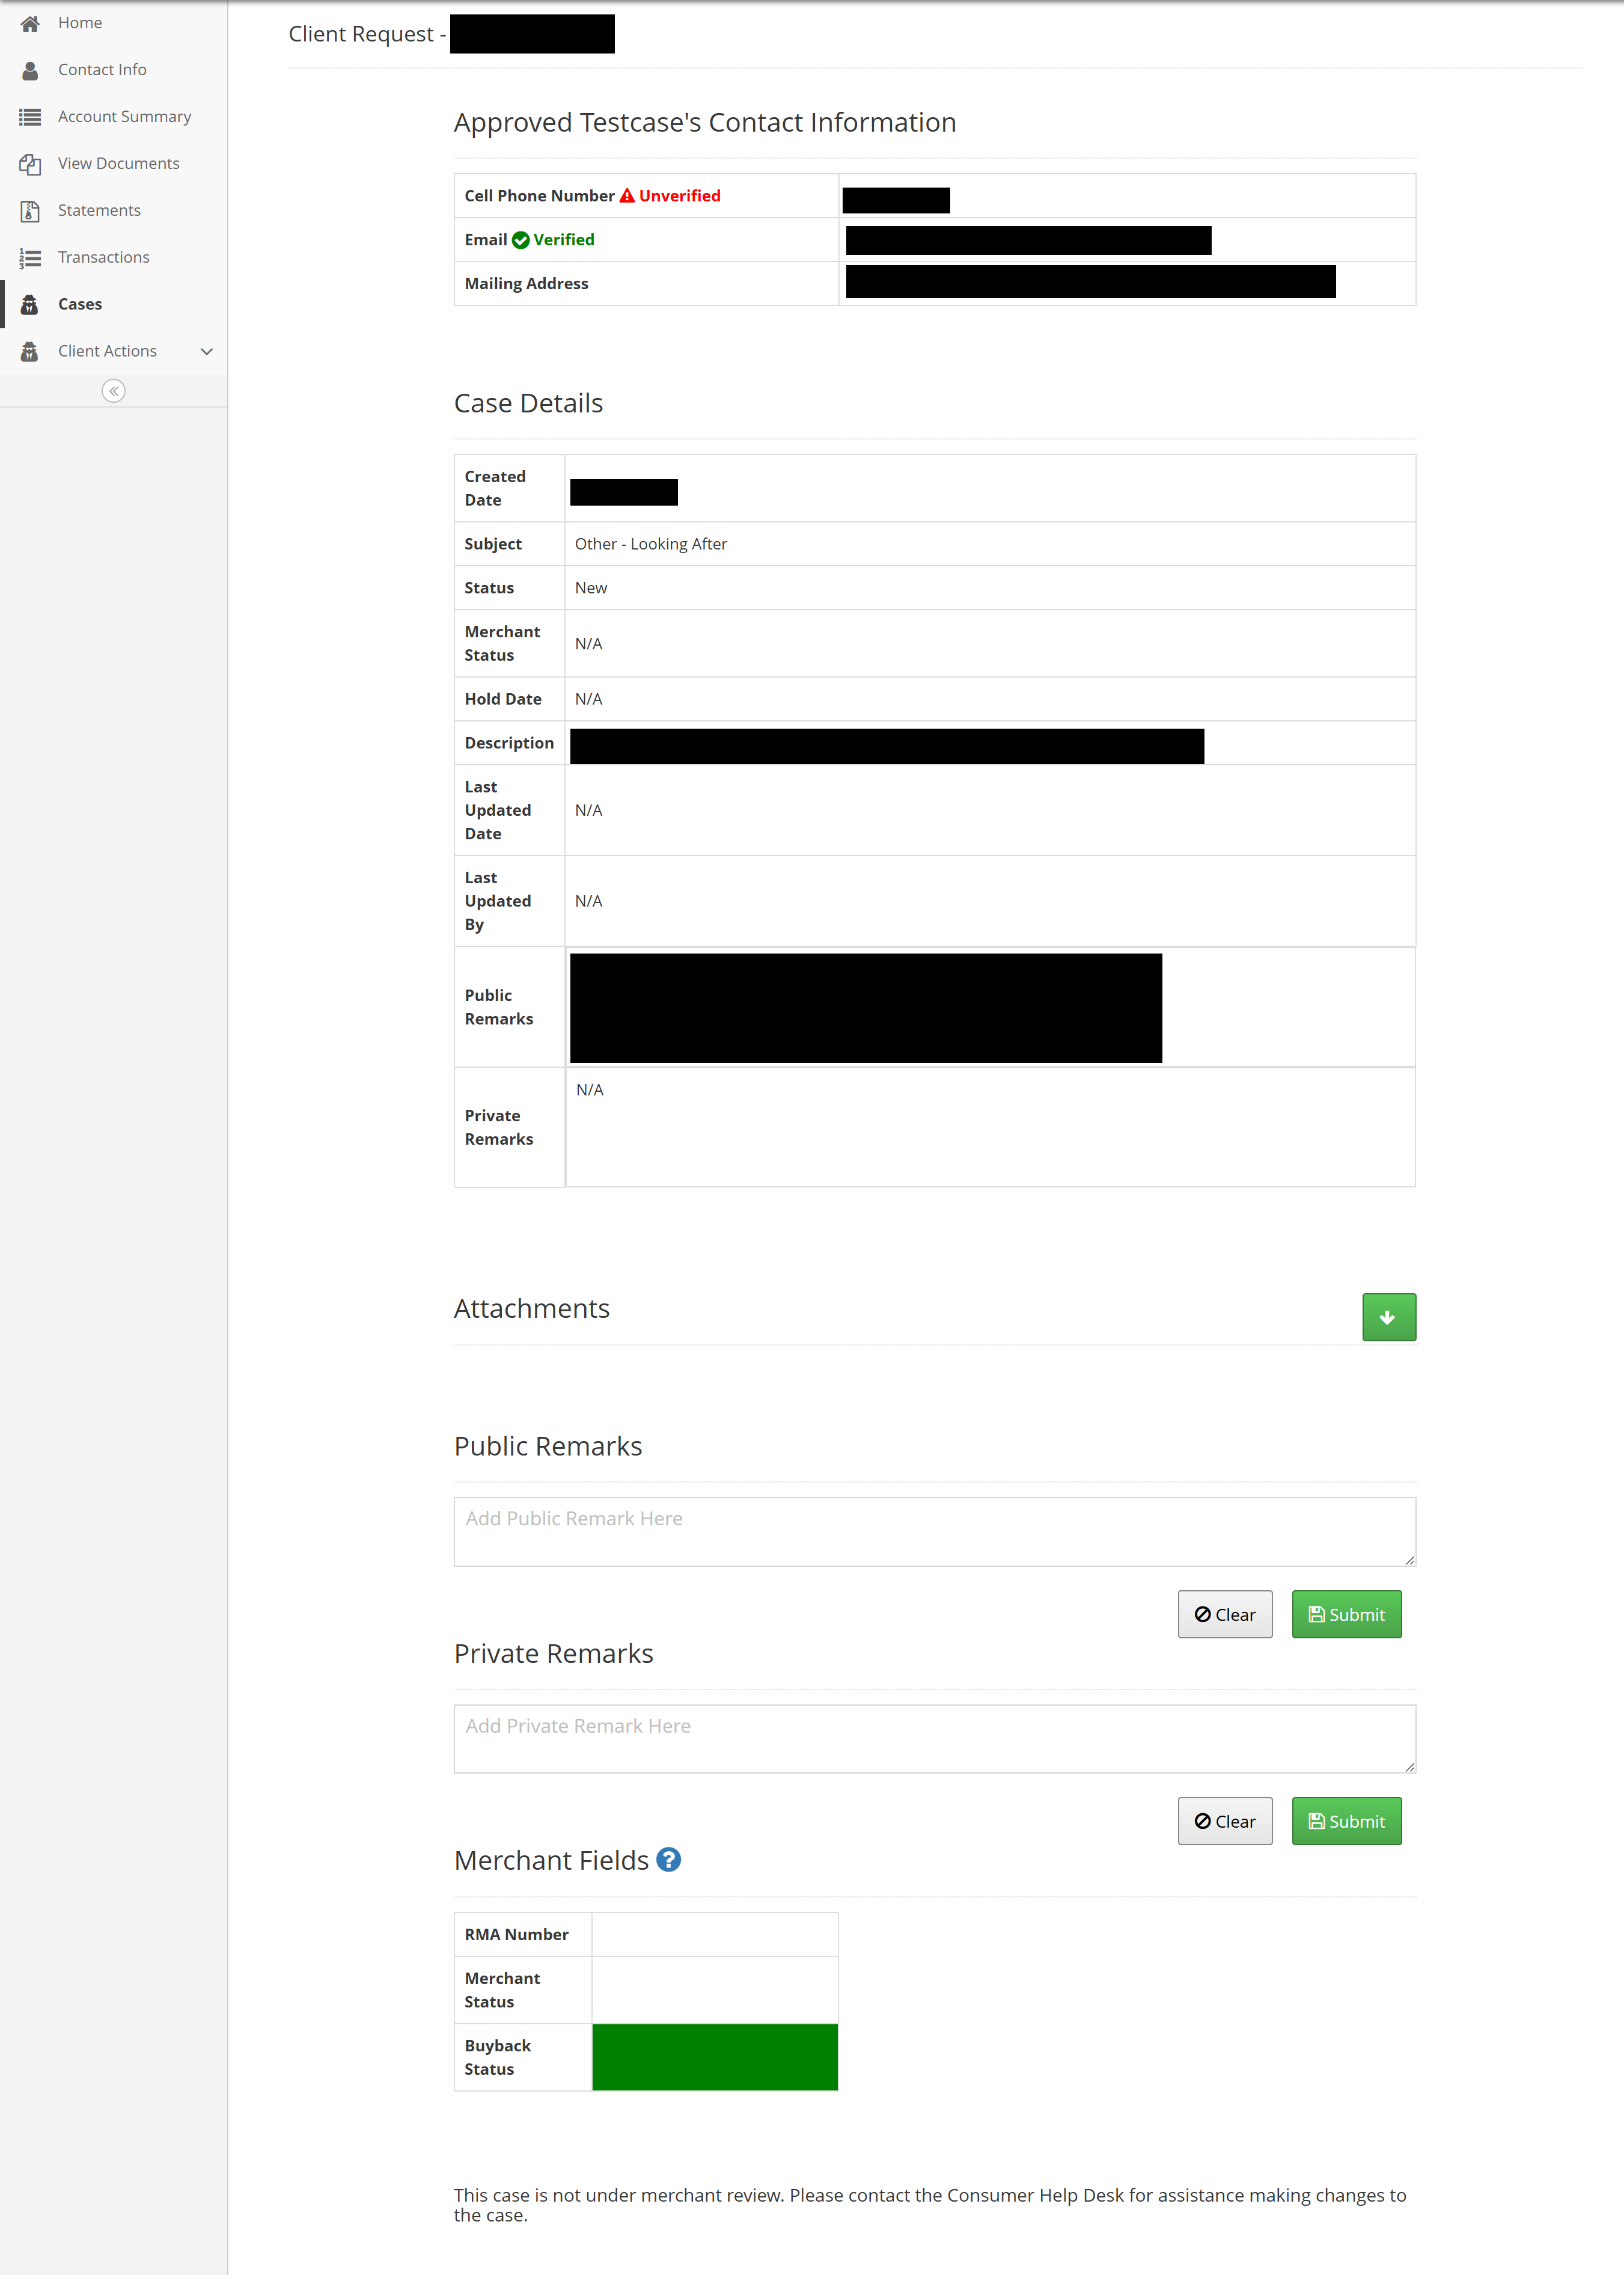
Upon submitting, you will be redirected to the
Review Casepage. This page is available at any time upon submitting that case, located inCasesfrom the sidebarAttachments and public remarks can be added for the merchant and others to review along with the information you provided. Private remarks can only be seen by you.
Client Submit Case Options | Review Case Page |
|---|---|
|
|
Update Contact Info
Allows users to edit consumer contact information on active loans. (This is a default permission to a user with a Merchant role)
View Assignment Invoices
Assignment Invoices provide itemized details on proceeds from purchasing and repurchasing (buyback) activity.
View Invoices
Provides users the ability to see all Merchant Invoices (PDF attachments)
Customers Without Credit Application
With this queue, users/employees will be able to view all customers that were created but, did not complete the credit application.
Increase LOC (Full Control)
This permission is given at a Merchant account level. Users/employees with this permission are able to increase or decrease the default line of credit that is established during contract origination.
⚠ This permission will only work if your finance program is setup to allow credit lines to be increased. Please contact merchant support to clarify if your program qualifies for this permission.
There are two ways to increase line of credit:
Increase the LOC during contract origination
Increase the LOC to add an additional charge
To increase a consumer's line of credit during contract origination, follow the below steps:
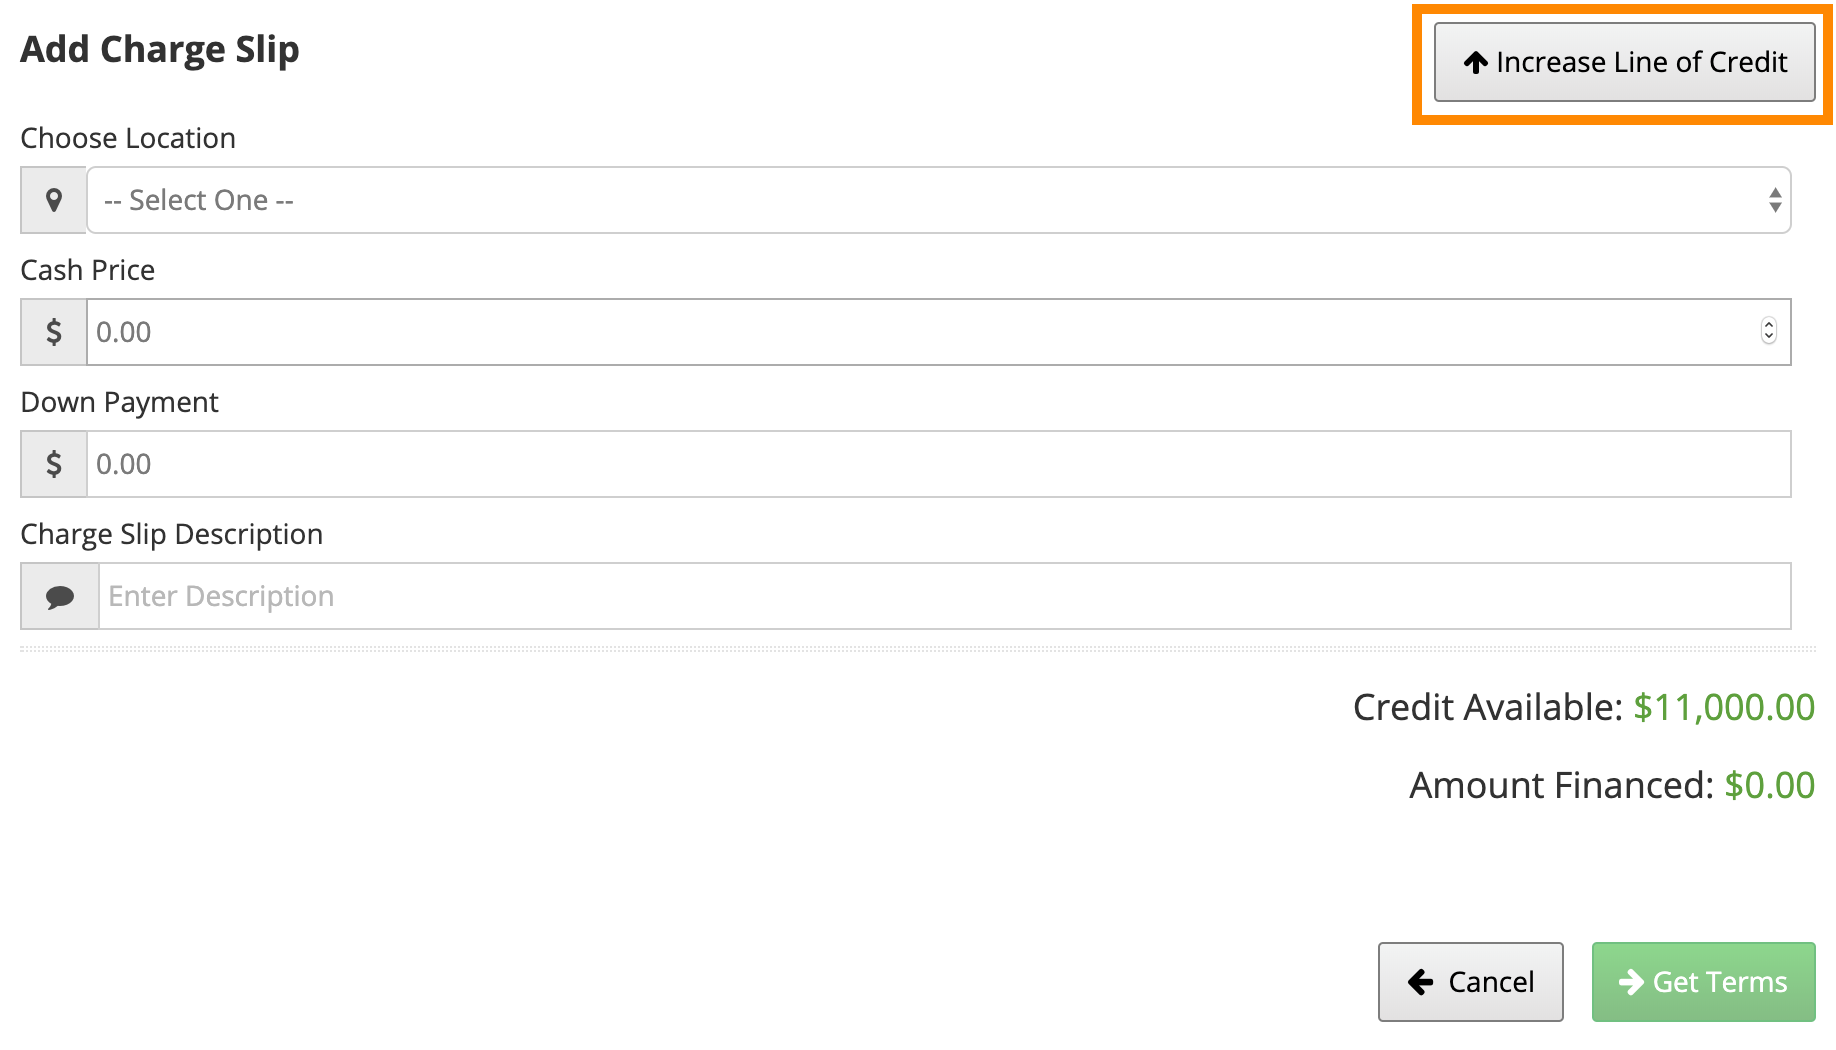
Fill out application as normal and when you get to the Add Charge Slip section, you will click the button that says Increase Line of Credit.
A pop-up will appear to Increase LOC.
When asking to increase the credit line, take the current credit line plus the additional amount being requested to enter in the "Line of Credit Request" field.
Example: If the current credit line is $10,000 and a $5000 increase is being requested, you would total them to enter a new credit line of $15,000.
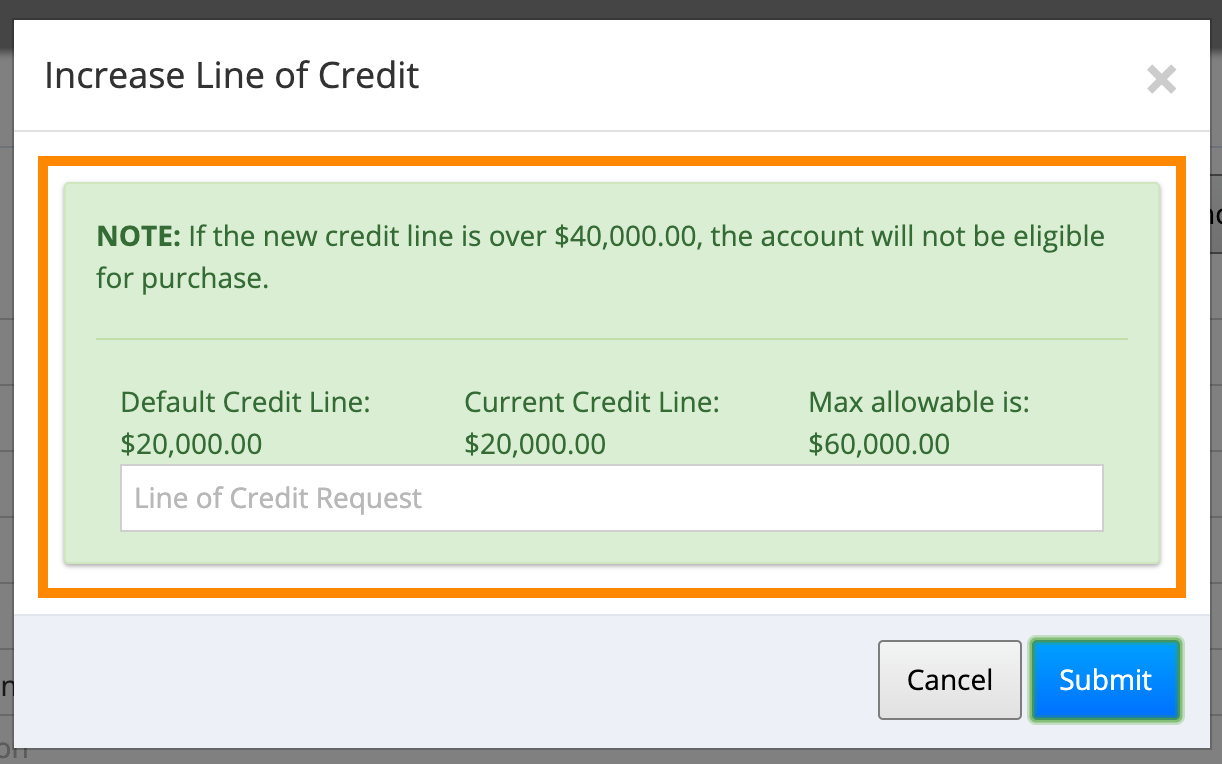
Click Submit when finished. Given all requirements are met, the LOC will have been increased and you will be able to continue.
To increase line of credit with an additional charge, follow the below steps:
Seach for the consumer in uPortal360.
Click View next the the consumer's name.
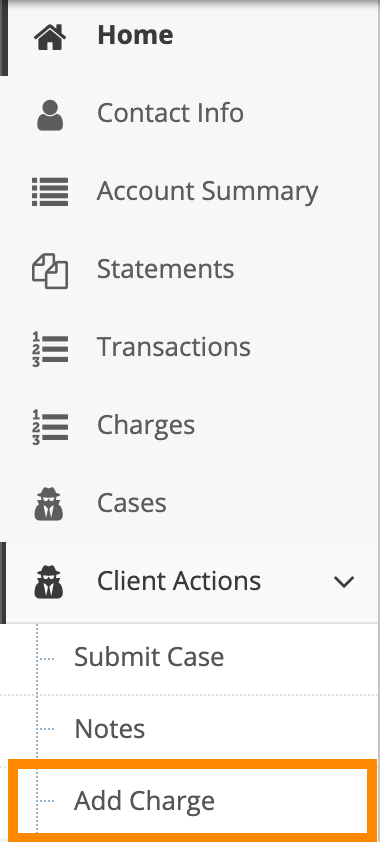
On the left, you will click Merchant Actions and then Add Charge
Follow the same steps from above to request an increase in the consumer's LOC.
Increase LOC FAQs
Can you increase the line of credit, more than the allowed amount?
Typically we do not increase the line of credit after the maximum amount is reached. The maximum credit amount is based on the consumer's creditworthiness. However, some of our merchant has Servicing Programs that allow them more flexibility in the Credit Limits as they will be in-house contracts. If you are interested in a Servicing Program or changing credit limits for your Finance Program, please engage Merchant Performance.
I don't have an option to Increse the Credit Limit?
This feature is not enabled for all Finance Programs. Please reach out to our Sales Team if you believe this is a feature that could benefit your company.
Post Payments
This permission allows the user/employees to post payments to the consumer's account.
This permission is given at a Merchant account level.
Resolve Credit Review
Overview: This permission allows Merchants to resolve a pending credit review application. To access our manual Credit Review page:
The finance program will need to be configured for
Tiers Pending.
How to use this permission:
To find applications in
Credit Review, go to My Queues —> To Do Queues and search forReview. Find the Application that you would like to review and clickView.The Resolve Credit Review page will load with Applicant Details.
View the Scorecard Log to understand why the Application went to Credit Review.
To view the Credit Report, click on the
View Credit Report.If there is an error with the Application (Maybe consumer didn’t enter their Income correctly or forgot to add a Co-Applicant), use the
Reset Credit Applicationbutton that will set the Credit Application to Draft.The merchant will be redirected to
Review Credit Applicationpage.Most likely, no updates will be needed. However, you can use this page to make any necessary modifications.
Use the email or text feature to send a link to the application to the consumer.
After review, decide on the application.
Either decline it or choose a credit tier.
Click
Submit.
To Do Queue | Resolve Credit Application Page | Credit Report | Tier Options | Review Credit Application |
|---|---|---|---|---|
|
|
|
|
|
.png)
.png)
.png)
.png)
.PNG)
Skip Trace
Overview: Skip tracing is the process of locating hard-to-find individuals or verifying contact information. This permission allows agents to retrieve the three most recent phone numbers for a contact in uPortal360.
How to use this permission:
Search for the customer by an account number
Navigate to
Agent actions → Skip Tracein the sidebarClick
Run Skip TraceThis calls out to a web service that retrieves the customer’s three most recent phone numbers. The agent will then attempt to contact the customer using each number and document the outcome of each call.
If a call successfully connects with the customer, the phone number will need to be manually updated on the Contact Info page. Regardless of the result, all calls are recorded into the agent notes logs.
Using Skip Trace | Skip Trace Results | Updating Contact Info |
|---|---|---|
|
|
|
.PNG)
 (2)(5).PNG)
.png)
Supervisor Review
Overview: Supervisor Review is a permission that enables users to manage and resolve escalated cases and third-party claims (such as bankruptcy). With this permission, supervisors can access the Manage Call Hold Queue, review flagged accounts, and take appropriate action to ensure timely resolution.
Customer account(s) marked for supervisor review, or an escalated support ticket (see the following for more information: Consumer Escalating a Support Ticket Case).
How to use this permission:
Managing Call Hold:
On the left
Sidebar→My Queues→Supervisor ReviewHitViewnext to the desired case to account.If an account is a 3rd party claim with no open support ticket case, a green pencil will appear next to review, which will lead straight to
Manage Call Hold.
Next go to
Sidebar→Agent Actions→Special Agent Action.Then scroll down and hit
Manage Call Hold.Fill in Call Hold End Date, Hold Call Reason, and Agents Note, and finally hit the
Submitbutton.
Supervisor Review Queue | Special Agent Actions | Manage Call Hold ( Pencil ) | Manage Call Hold |
|---|---|---|---|
|
|
|
|
.png)
.png)
.png)
.png)